Honeywell 8000 Installation Manual: A Comprehensive Plan
This manual details the Honeywell 8000’s installation, operation, and maintenance. It covers wiring guides for conventional systems and WiFi setup, alongside accessory installation.
The VisionPro 8000 manual (69-1706) offers detailed instructions, while Honeywell.com/TCC provides registration and support resources for optimal system performance.
Ensure careful reading of all instructions before beginning, referencing the user guide for additional assistance and understanding the installer setup configurations.
The Honeywell 8000 thermostat represents a significant advancement in home comfort and energy management. This system, including the VisionPro 8000 model, integrates seamlessly with various HVAC systems, offering precise temperature control and enhanced efficiency. Understanding its capabilities is crucial for a successful installation and optimal performance.
Designed for both conventional and WiFi-enabled setups, the Honeywell 8000 provides flexibility to suit diverse home environments. The system’s core functionality revolves around maintaining consistent temperatures, reducing energy consumption, and providing users with convenient control options. Its robust features include remote access via mobile devices, programmable schedules, and compatibility with accessory sensors.

This installation manual serves as a comprehensive guide, walking installers through each step of the process, from unpacking and component verification to final system checks. It emphasizes safety precautions and provides detailed wiring diagrams for both conventional and WiFi configurations. Proper installation ensures the system operates reliably and delivers the intended benefits, maximizing homeowner satisfaction and minimizing potential issues. Referencing the user guide alongside this manual is highly recommended.
Honeywell’s commitment to innovation is evident in the 8000’s design, offering a user-friendly interface and advanced features.
Unpacking and Component Verification
Upon receiving your Honeywell 8000 system, carefully inspect the packaging for any signs of damage during transit; If damage is evident, immediately document it with photographs and contact the carrier and your Honeywell supplier. Do not proceed with installation if the packaging appears compromised.
Once the packaging is opened, verify that all components listed on the packing slip are present. This typically includes the thermostat unit itself, a mounting plate, screws and anchors for wall mounting, wire labels, and the installation manual. For WiFi models, ensure the inclusion of any necessary network connectivity components.
Inspect each component for physical defects. Check the thermostat display for cracks or damage, and ensure all wiring terminals are intact. Confirm the mounting plate is free from bends or breaks. A missing or damaged component should be reported immediately to Honeywell for replacement.
Retain the original packaging and all documentation for potential warranty claims or future reference. Proper component verification at this stage prevents delays and ensures a smooth installation process. A part number like 32003796-001 may be included for covering old thermostat marks.
Safety Precautions and Warnings
Prior to commencing any installation work, disconnect power to the heating and cooling system at the breaker panel. Failure to do so presents a serious risk of electrical shock or damage to the equipment. Always verify the power is off with a reliable voltage tester.
Installation should be performed by a qualified HVAC technician familiar with low-voltage wiring and safety procedures. Improper wiring can lead to system malfunction, fire hazards, or void the product warranty. Adhere strictly to all local and national electrical codes;
Exercise caution when handling wiring. Ensure wires are securely connected and properly insulated to prevent short circuits. Avoid touching bare wires or terminals. Use appropriate personal protective equipment, including insulated tools and safety glasses.
Read and understand all instructions in this manual before beginning installation. Failure to follow these instructions could result in improper operation or damage to the Honeywell 8000 thermostat. Pay close attention to warnings regarding remote sensor installation (C7189U) and follow all guidelines carefully.
Tools Required for Installation
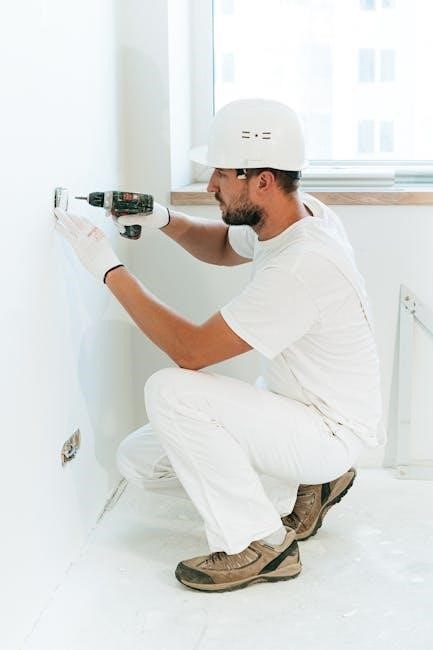
A comprehensive toolkit is essential for a successful Honeywell 8000 installation. You will require a Phillips head screwdriver for mounting the thermostat and accessing terminal blocks. A flathead screwdriver may also be needed for certain wiring connections.

A reliable voltage tester is crucial for verifying power is disconnected before commencing any electrical work. Wire strippers are necessary for preparing wires for secure connections. Pliers can assist with bending and manipulating wires within the wall or equipment enclosures.
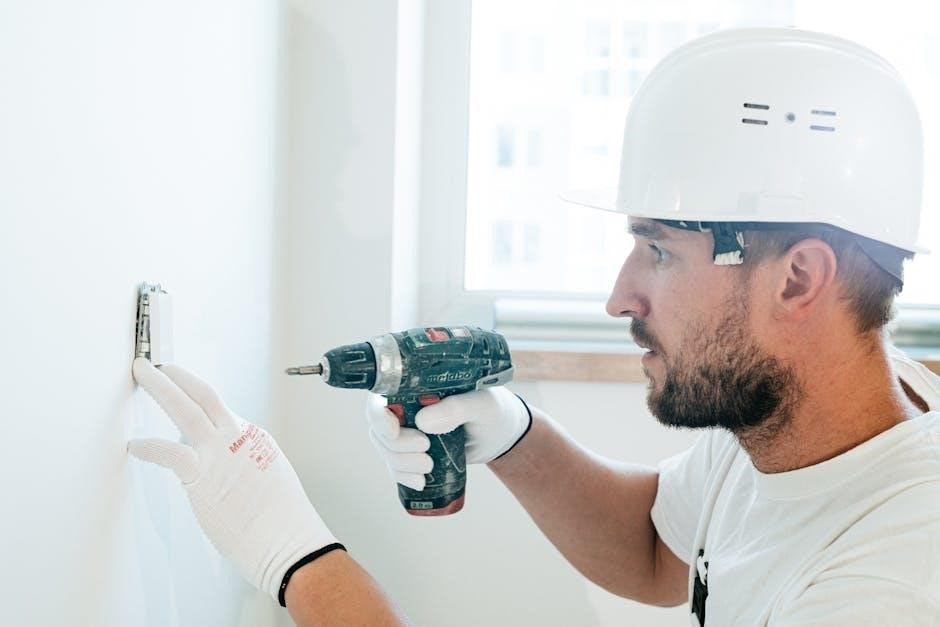
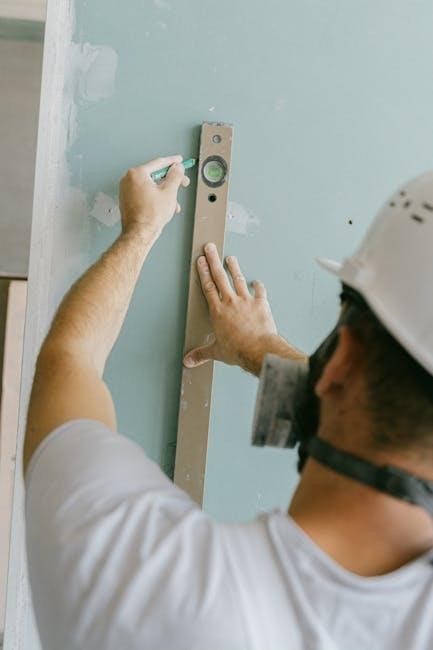
A level is vital for ensuring the thermostat is mounted straight and accurately. A drill with appropriate drill bits will be required for creating mounting holes in the wall. A pencil is useful for marking hole locations. Consider a wire labeling kit for clear identification of wiring.
Depending on the installation environment, a fish tape may be needed to run wires through walls. Additionally, a small vacuum cleaner can help remove debris from the installation area. Having a multimeter available can aid in troubleshooting potential wiring issues.
Wiring Guide: Conventional Systems
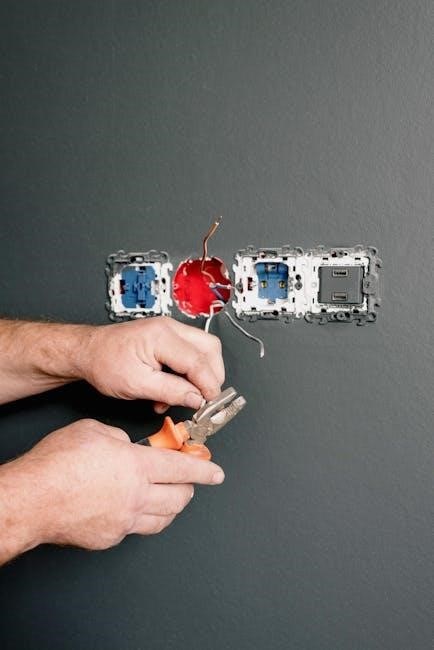
For conventional systems, careful wiring is paramount for proper Honeywell 8000 operation. Typically, you’ll encounter Rh and Rc terminals – these often require a jumper if powered by a single transformer. W is for heat, Y for cooling, and G controls the fan.
The C-wire (common wire) is often required for consistent power, especially with WiFi models. If a C-wire isn’t present, a C-wire adapter may be necessary, following the adapter’s specific instructions meticulously. Ensure all wiring connections are secure and conform to local electrical codes.
Refer to the installation guide (69-238903) for detailed wiring diagrams specific to your heating and cooling system. Incorrect wiring can damage the thermostat or your HVAC equipment. Double-check all connections before applying power.
Pay close attention to wire gauge compatibility and use appropriate connectors. Properly labeled wires simplify troubleshooting. If unsure, consult a qualified HVAC technician to avoid potential hazards and ensure a safe, functional installation.
Wiring Guide: WiFi Thermostat Setup
The Honeywell 8000 WiFi thermostat demands a stable power supply, often necessitating a C-wire connection. Without a C-wire, the thermostat may exhibit inconsistent performance or fail to connect to the WiFi network. A C-wire adapter can be utilized if one isn’t readily available, but follow the adapter’s instructions precisely.
Ensure the thermostat is within range of your WiFi router during setup. The initial configuration requires a stable internet connection for registration and firmware updates. Verify your network’s security protocol (WPA2 is recommended) and have your password readily available.
During the wiring process, confirm the ‘Y’ wire is correctly connected for cooling and ‘W’ for heating. Incorrect wiring can prevent WiFi connectivity and proper system control. The Honeywell Home app guides you through the WiFi setup process step-by-step.
Registering your thermostat at Honeywell.com/TCC unlocks additional features and support. Troubleshooting WiFi connectivity issues often involves checking router settings and ensuring the thermostat’s firmware is up-to-date.
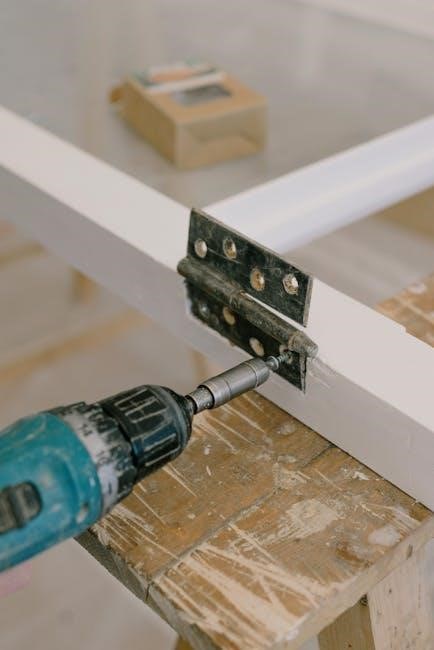
Mounting the Honeywell 8000 Thermostat
Prior to mounting, ensure the backplate is securely fastened to the wall, utilizing the provided screws and anchors. Verify the backplate is level to guarantee accurate temperature readings and a professional appearance. If covering marks from a previous thermostat, utilize part number 32003796-001 for a clean finish.
Carefully route the thermostat wires through the opening in the backplate, avoiding any pinching or strain. Ensure sufficient wire length remains for easy connection to the thermostat terminals. Gently push any excess wire back into the wall cavity.
Align the thermostat body with the backplate and firmly snap it into place. A distinct click confirms a secure connection. Avoid excessive force, which could damage the thermostat or backplate.
Double-check all wire connections before powering on the system. A loose connection can lead to inaccurate readings or system malfunction. Refer to the wiring diagram for confirmation; Proper mounting is crucial for optimal performance and longevity of the Honeywell 8000.
Initial Power-Up and System Check
Upon completing the mounting and wiring, restore power to the HVAC system. Observe the Honeywell 8000 thermostat display; it should illuminate, initiating the startup sequence. Allow several moments for the system to fully power on and complete its self-tests.
Verify the thermostat displays the correct date and time. If incorrect, access the settings menu to adjust these parameters. Accurate timekeeping is essential for scheduling and system logs.
Test the heating and cooling functions independently. Raise the setpoint temperature to activate the heating system and lower it to activate cooling. Confirm that the corresponding HVAC equipment responds accordingly.
Monitor the system for any unusual noises or error messages. Address any issues immediately, consulting the troubleshooting section of this manual or contacting Honeywell support. A thorough initial check ensures proper operation and prevents potential problems.
Confirm remote sensor communication, if installed, is functioning as expected.
Installer Setup and Configuration
Accessing Installer Setup requires navigating the thermostat’s menu. Typically, this involves pressing the ‘Menu’ button, then entering a specific installer code – often ‘0123’ or a custom code set previously. Refer to the user guide for the exact procedure.
Within Installer Setup, configure system parameters like heating and cooling stages, fan control, and temperature sensor calibration. Accurate configuration is crucial for optimal system performance and energy efficiency.
Pay close attention to wiring configurations, ensuring they match the physical wiring connections made during installation. Incorrect settings can lead to system malfunctions or damage.
Utilize the installer test function to verify proper operation of all components. This test simulates various operating conditions, allowing you to identify and resolve any issues before handing over the system to the end-user. Remember to save all changes before exiting Installer Setup.
Making changes and performing an installer test is vital for a smooth operation.
Registering Your Honeywell 8000
Registering your Honeywell 8000 thermostat unlocks access to valuable resources and support. This process typically involves visiting the Honeywell website – Honeywell.com/TCC – and creating an account or logging into an existing one.
During registration, you’ll need to provide key information, including the thermostat’s model number, serial number (usually found on the device itself or its packaging), and your contact details.
Registration enables access to warranty information, software updates, and exclusive offers. It also allows Honeywell to provide targeted support and assistance should you encounter any issues with your thermostat.
Furthermore, registration facilitates access to online documentation, FAQs, and troubleshooting guides, empowering you to resolve common problems independently. It’s a simple step that significantly enhances your ownership experience and ensures long-term system reliability.
Don’t delay – register your Honeywell 8000 today for peace of mind and optimal performance!
Understanding the User Interface
The Honeywell 8000 boasts an intuitive user interface designed for ease of operation. The central element is the touchscreen display, providing access to all thermostat functions and settings.
Navigating the interface involves simple touch gestures – tapping, swiping, and pressing the Menu button. The main screen typically displays the current temperature, setpoint, and operating mode (Heat, Cool, Auto, Off).
The Menu button unlocks advanced settings, including scheduling, fan control, system configuration, and installer setup. Within each menu, options are clearly labeled and organized for straightforward access.
Familiarize yourself with the icons representing different functions – a snowflake for cooling, a flame for heating, and a fan for fan control. The interface also provides visual cues, such as color changes, to indicate system status.
Exploring the user interface empowers you to customize your comfort settings and optimize energy efficiency. Refer to the user guide for detailed explanations of each function and setting.

Making Changes to Installer Setup
Accessing the Installer Setup requires a specific procedure to prevent accidental modifications. Typically, this involves pressing and holding the Menu button for a designated duration, often around five seconds, until the installer screen appears.
Within Installer Setup, you can adjust critical system parameters, including wiring configurations, sensor types, and advanced control settings. Exercise caution when modifying these settings, as incorrect adjustments can impact system performance.
Changes are made by navigating through the menu options using the touchscreen, selecting the desired parameter, and entering the new value. The interface often provides prompts and validation checks to minimize errors.
Remember to document all changes made to the Installer Setup for future reference and troubleshooting. This documentation should include the original settings and the new values entered.
After making changes, thoroughly test the system to ensure proper operation. Refer to the Honeywell documentation for specific testing procedures and verification steps. Always prioritize safety and consult a qualified technician if needed.
Performing an Installer Test
The Installer Test is a crucial step to verify the correct functionality of the Honeywell 8000 system after installation or any configuration changes. This comprehensive test simulates various operating conditions to ensure all components are working as expected.
To initiate the test, navigate to the “Installer Test” option within the Installer Setup menu. This typically involves selecting the test mode and then cycling through different system functions, such as heating, cooling, and fan operation.
During the test, carefully observe the thermostat’s display and the connected HVAC equipment. Verify that the system responds correctly to each command and that all sensors are providing accurate readings.
Pay close attention to any error messages or unusual behavior. Document any issues encountered during the test for troubleshooting purposes. Correct any identified problems before proceeding.
A successful Installer Test confirms that the system is properly configured and ready for user operation. It provides confidence in the reliability and performance of the Honeywell 8000 thermostat.
Accessory Installation (Remote Sensors)
Expanding the Honeywell 8000’s capabilities often involves installing remote sensors to monitor temperature and humidity in various zones throughout a building. These sensors enhance comfort and optimize energy efficiency by providing more granular control.
Installation typically requires mounting the sensor in a representative location within the desired zone, away from direct sunlight or drafts. Ensure the sensor is within range of the Honeywell 8000 thermostat for reliable communication.
The C7189U remote indoor sensor, for example, has specific dimension requirements and installation guidelines. Carefully follow the provided instructions to ensure proper placement and functionality.
Once physically installed, the sensors must be paired with the thermostat through the Installer Setup menu. This process usually involves entering a unique sensor ID or initiating a discovery mode.
After pairing, verify that the thermostat accurately displays readings from the remote sensors. Configure zone settings to utilize the sensor data for optimized temperature control and improved comfort levels;

Troubleshooting Common Installation Issues
During Honeywell 8000 installation, several common issues may arise. A frequent problem is communication failure between the thermostat and remote sensors; ensure sensors are within range and properly paired via the Installer Setup menu.
Wiring errors are also prevalent, particularly in conventional systems. Double-check the wiring guide (69-238903) to confirm correct connections, paying close attention to polarity and terminal assignments.
If the thermostat fails to power on, verify the power supply and circuit breaker. Confirm that the wiring is secure and that no shorts or open circuits exist.

Incorrect configuration settings can lead to inaccurate temperature readings or improper system operation. Review the Installer Setup and ensure all parameters are correctly configured for your specific system.
For persistent issues, consult the Honeywell VisionPro 8000 Install Manual or contact Honeywell support for assistance. Detailed troubleshooting steps and FAQs are available online at Honeywell.com.
Honeywell VisionPro 8000 Specifics
The Honeywell VisionPro 8000 boasts advanced features requiring careful attention during installation. This system often integrates with complex HVAC setups, demanding precise wiring and configuration according to the 69-1706 installation manual.
Unique to the VisionPro 8000 is its extensive customization within the Installer Setup. Technicians can tailor settings for various system types, optimizing performance and energy efficiency.
Remote indoor sensors (C7189U) are frequently used with this model, enhancing temperature accuracy throughout the home. Proper placement and pairing are crucial for optimal functionality.
The VisionPro 8000’s user interface offers detailed diagnostics and control options. Familiarizing yourself with these features allows for efficient troubleshooting and system adjustments.
Remember to register your VisionPro 8000 at Honeywell.com/TCC to access warranty support and software updates. Refer to the manual for specific model numbers like TH8321WF1001.